JAVA AND APPIUM INSTALLATION
Hi guyes,
i'm sharing the detail steps to install and configure JAVA and appium.
Step1: go to https://developer.android.com/sdk/index.html

Step2 : Download Android studio and Run exe file
Step 3: Post installation copy SDK folder from the present location.
C:/Users/user/AppData/Local/android/SDK
Note: AppData folder in invisible mode, enable invisible folder option

Note: create Appium folder in c drive
Step 4: Copy sdk from the path ( C:/Users/user/AppData/Local/android/SDK) and placed in C:/Appium folder.

Step 5: Download JDK ( Java) from the below given url
http://www.oracle.com/technetwork/java/javase/downloads/jdk8-downloads-2133151.html

Step 6: Set System variables path both JAVA and Android.
Setup environment variable-> go to system main drive-> right click and select properties->Click on advanced system settings ->go to Advanced ->click on Environment variable->

Click on New button under Environment variable – Set JAVA Path

Create variable called JAVA_HOME and paste the value as ‘JAVA PATH’ and click on ok button.

Set another below path in System variable -> under path variable
C:\Program Files\Java\jdk1.8.0_45\bin

Create variable called ANDROID_HOME and
paste the value as ‘C:\Appium\sdk’ and click on ok button.

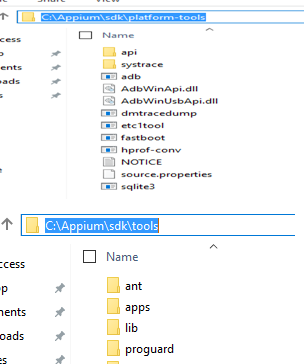
Also Add below paths in the Path variable under system variable as shown image in the next
Add below paths in Path Varibales
C:\Appium\sdk\tools
C:\Appium\sdk\platform-tools

Step 8: Install Eclipse IDEE
Download "Eclipse IDE for Java Developers“
http://www.eclipse.org/downloads/
Note: Make sure select Eclipse ID

Download Zip file and extract in C drive.

Step 9: go to eclipse folder -> and click on eclipse.exe

Step10: put the following path (any path)as workspace -> Click on OK button

Step 11: Create Eclipse project
Right click on Eclipse -> Select New -> Other-> Select JAVA Project-> Click Next

Enter Project Name as ‘TestJava’ and click Finish -> Select NO.

Install ADT pulgIn
Step 12: Install ADT Plugin into eclipse following instructions from below ink.
http://developer.android.com/sdk/installing/installing-adt.html
Follow the instructions.

Copy the URL shown in circle
Step 13: Eclipse Help-> Install New Software

Step14: Select Developer tools -> click on Next

Step 15: click on Next

Step 16: Click on Finish

Restart Eclipse -> Upon restarting ->select below location and click OK,

Step 17: Configure ADT Plugin:
Windows -> Perspective -> customize perspective

Make sure select Android SDK and AVD Manager in both locations shown below

Step18:
Create AVD Virtual devise.
Click on below icon in Eclipse.

Configure AVD emulator

https://www.microsoft.com/en-us/download/details.aspx?id=30653
Download and Install the framework.
Step 19: Appium Installation
download the appium from the given url
http://appium.io/downloads.html


Click on Appium –installer-> extract in the Appium C:\Appium\Appium folder

Click on Appium-installer -> click on appium installer.exe
Step 20: Appium Java client JAR and Selenium Jar download from Maven
go to http://mvnrepository.com/artifact/io.appium/java-client/2.1.0
and download Java-client jar file.
Step 21: Download selenium Java from the below path.
http://docs.seleniumhq.org/download/
Note: Always consider Latest Version

Step 22: Download Zip file and extract in C drive.
C:\selenium-2.47.0\


